Full/Part Matching

- Introduction
- Purpose of this document
- Using Part Matching
- User Settings
- Illustrated Examples
- Match Financial Documents
- Default Settings
- Working currency
- Group By
- First Column
- Order By
- Interactive column headers
- Auto match
- Credit notes
- Match
- Unmatch a matching set
- Write Off
- Matching in currency
- Reports and enquiries
- Reports
- Enquiries
- Customer receipts
- Supplier payments
- Currency matching
- Cash accounting
- CIS changes
- Employee payments
- Changes to credit and refund screen
Introduction
This document explains the BCE Part Matching feature that includes the following functions:
Matching, partially or fully
Unmatching previously matched documents
Aged Reporting
A pdf version of the 'Part Matching - User Notes' can be downloaded from here
Purpose of this document
This document is intended as a guide for our internal teams to understand the BCE Part Matching feature. It will be used as a basis for the online guide that will be published later.
Using Part Matching
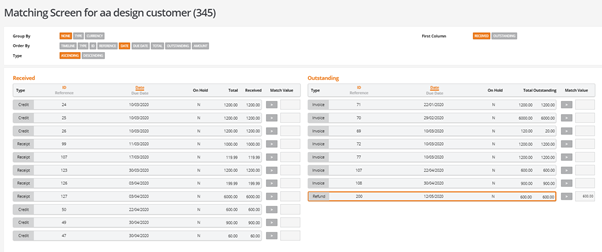
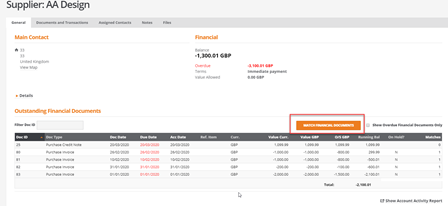
In both customer accounts and supplier accounts, on the general tab there is a button called ‘Match Financial Documents’. This will put the user into the ‘Matching Screen’.
This will show the outstanding payments or receipts (dependant on whether for a customer or a supplier account) and the outstanding types of documents i.e. invoices for the account.
User Settings
Write Off Limits
The ability to write off mismatch allocations is available in the part matching screen.
Example invoice for 200.00 and payment for 199.99.
To enable this to be used in a controlled manner there are limits that can be set for each user:
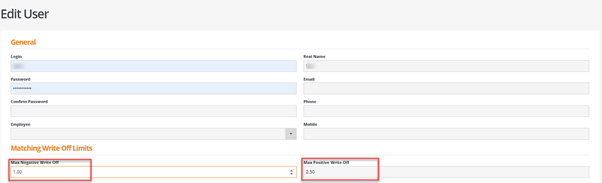
Note: If no value is set for either the negative or positive write off then the user will not be allowed to write off any value.
Illustrated Examples
Match Financial Documents
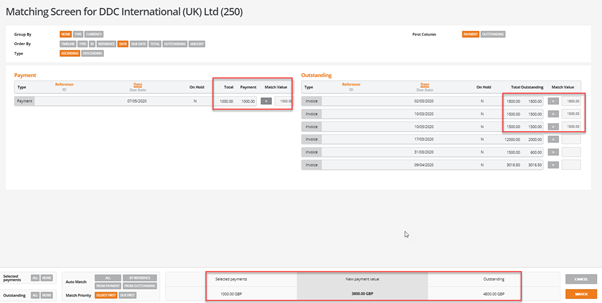
In customer and supplier accounts on the General tab there is an option to select documents to match called ‘Match Financial Documents’:
When the ‘Match Financial Documents’ screen is entered the user will be presented with the following screen if only base currency (GBP) is being used on the account:
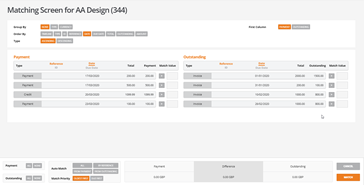
If currency is being used for documents an extra working currency option will be available.
Default Settings
All the buttons presented in orange are the default settings. These are useful for changing how the data is shown on screen.
If the user changes any of these defaults and relaunches or reloads the screen the changed settings will remain. Below is an explanation of all of the options:
Working currency
This has a default setting of GBP:

When selecting any other currency than GBP it will show the original amount and then the amount underneath will show converted into the selected currency. This will apply to payments or receipts and invoices:
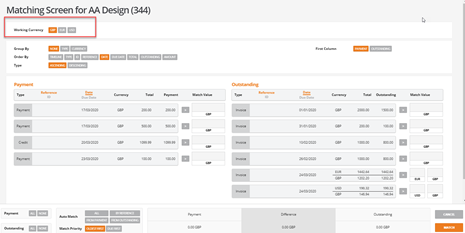
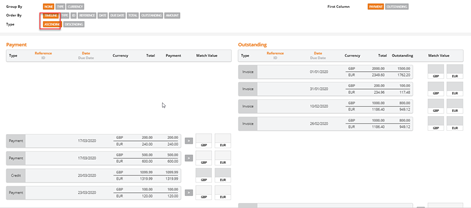
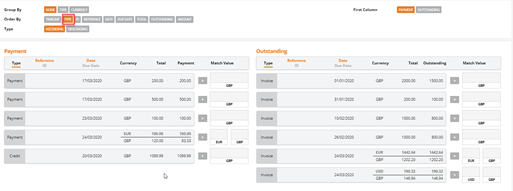
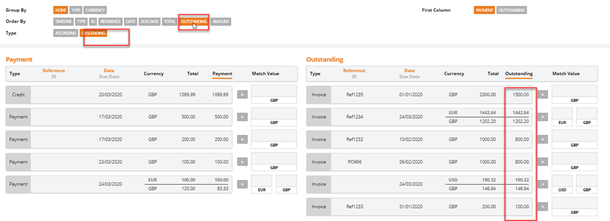
Group By

The user can choose to group by none, type or currency. None is the default option.
If selecting to group by type it will group all document types together.
If selecting to group by currency it will show all the data grouped by any currency that the account has documents in:
First Column


By default, the screen will show all outstanding receipts, payments or credits on the left and all outstanding invoices and /or refunds on the right.
This can be changed by selecting the outstanding column option to be the default.
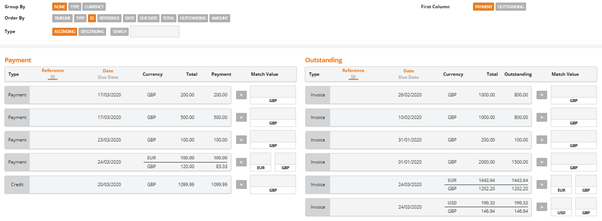
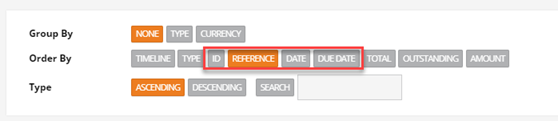
Order By
There are various ways of ordering the data shown on screen. See below for options and further information on each option.
Timeline
When selecting ‘Timeline’ the order of the documents will show in date order and by default be in ascending order. This can be reversed by selecting descending. The order by function will apply to both payment/received and outstanding documents:
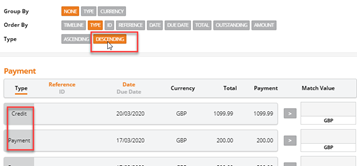
Type
Ordering by ‘Type’ will show documents grouped together in ascending order. This can be reversed by selecting descending:
ID
When sorting by ‘ID’ the sort will be in numerical order and ascending by default:
If there are two ID’s with the same number it will also use the date to show them in ID and date order. This can be reversed by selecting descending.
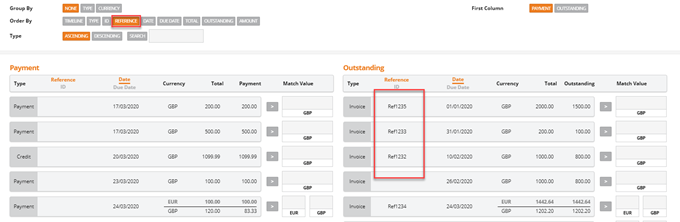
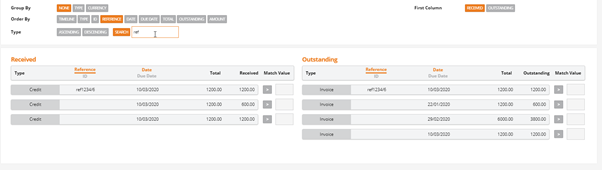
Reference
Ordering by ‘Reference’ will show all received and outstanding data in ascending order by reference if the document has a reference. This can be reversed by selecting descending:
ID and Reference Search
With both ‘ID and Reference’ there is an extra search option available to help find documents.
When searching by ID the number typed into the search box will bring the receipt/payment or outstanding document to the top of the selection:
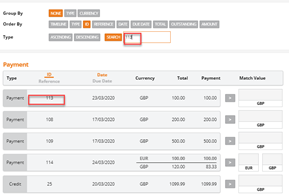
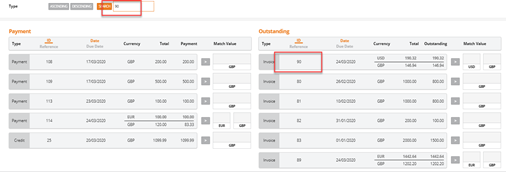
When searching by reference the information typed into the search box will bring the receipt/payment or outstanding document to the top of the selection:
Date
Ordering by ‘Date’ will show all data in date order, starting with oldest date first. This can be reversed by selecting descending:

Due Date
Ordering by Due Date will show all data with a due date in ascending due date order. This can be reversed by selecting descending.
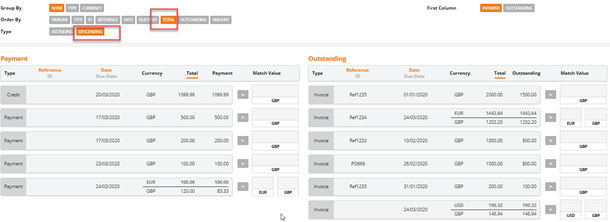
Total
Ordering by Total will show all data in descending total value order by default. This can be reversed by selecting ascending:
Outstanding
Ordering by ‘Outstanding will show all data in descending outstanding value order by default. This can be reversed by selecting ascending:
Amount
Ordering by amount allows the user to bring any documents that have been selected during the matching process to the top of the screen in either ascending or descending order, this is useful if there are multiple documents selected:

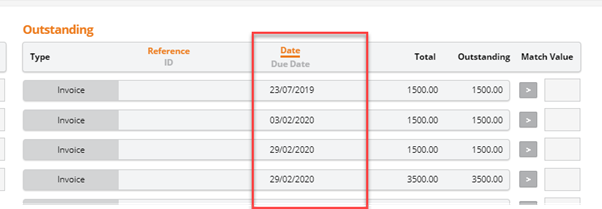
Interactive column headers
There is the option to select to change the column headers for ID, reference date and due date:
Once one of these options is selected in the order by group then the column heading will be underlined to show what is being used to order the documents by.
Example
If the user selects to order by date then the documents will show in date order:
This can then be changed to show the due date by clicking the due date under the orange line:
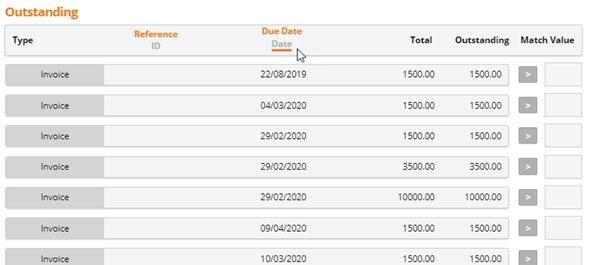
Note: Date will still be underlined to show that that was the selection in the order by option at the top.
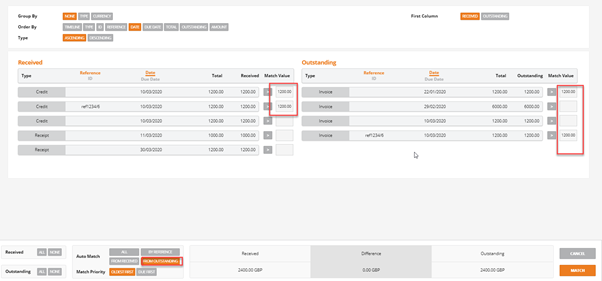
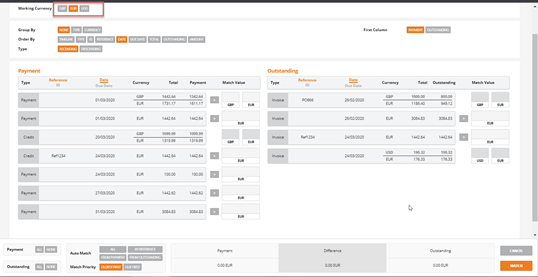
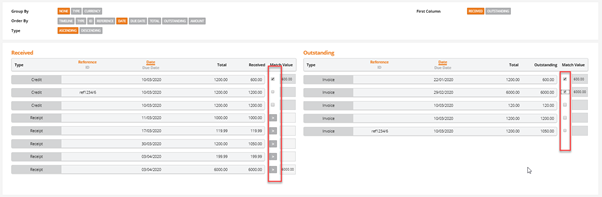
Auto match
At the bottom of the matching screen there are options that allow the payment/receipts and outstanding documents to be selected.
Select ‘All’ in the received/payments or outstanding part of the table and the matching screen will be filled with the maximum outstanding value for each of the items selected:
Example
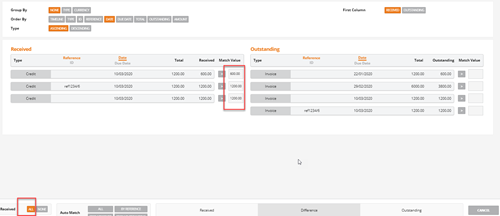
In the same way selecting ‘None’ will remove the value for each item and put it back to zero/not selected.
Auto Match
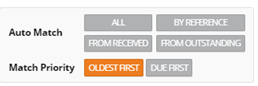
By default auto match is set to select by oldest date first. This can be changed to due date if required.
An auto match option must be selected before the system will proceed to match anything:

Select ‘All’ from the Auto matching – This will total up all received and outstanding documents to match everything to the value of the selected receipts:
Auto match by reference will select any documents that have the same reference for matching:
Select by from received/payment or from outstanding and the system will total up the selected values and match the other side to the selected value:
Once the relevant documents have been chosen select Match.
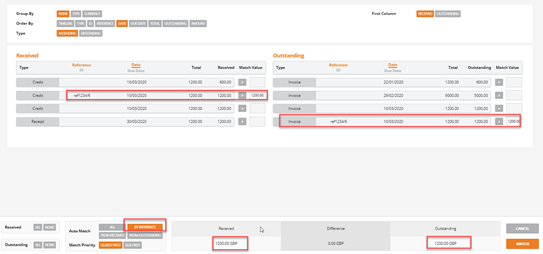
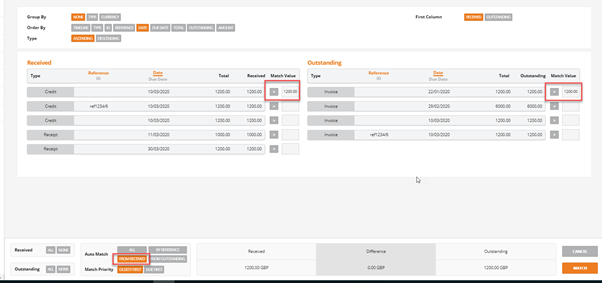
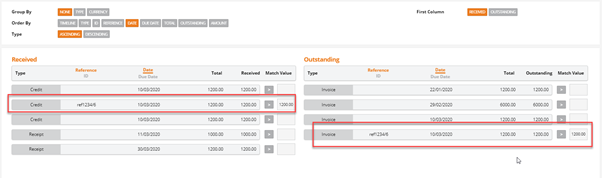
Credit notes
If a credit note has been created from an invoice for either sales or purchases and both the credit note and the invoice are still outstanding on the account, if the invoice is selected in the matching screen then the credit will be automatically selected by the system to be matched to it:
Match
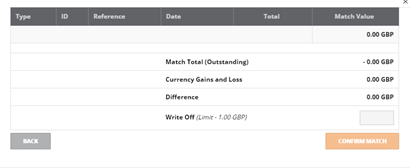
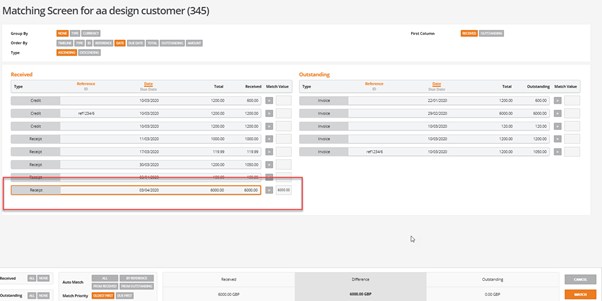
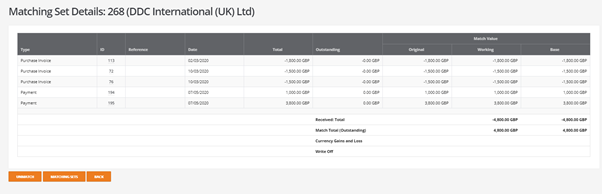
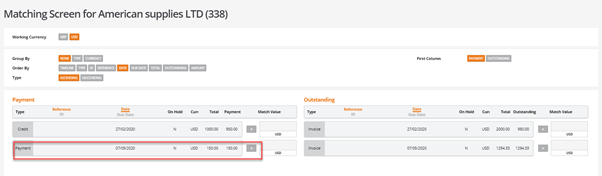
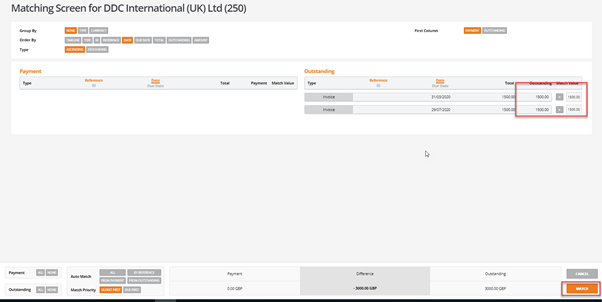
The match screen shows the documents that have been selected for matching:
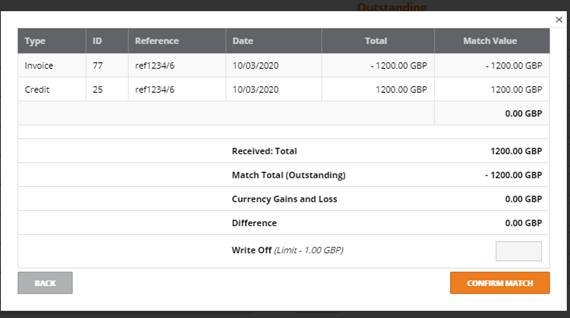
If there are no differences in the selected values then the confirm match button will be orange and active. The documents can then be matched.
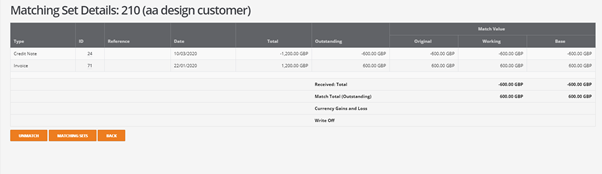
This will create a matching set in the system that can be viewed in either the customer or supplier show screen under the documents and transactions tab in the new financial matching sets option.
Note: If the match button is selected without selecting any documents the match screen will appear but have nothing available to process. Click the back button or esc to return to the previous screen:
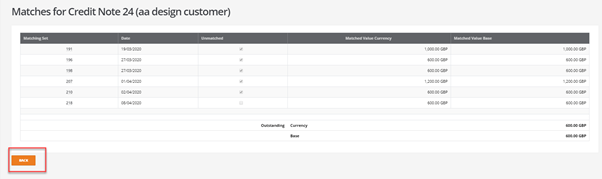
Click on the financial matching sets ID to view the matching information:

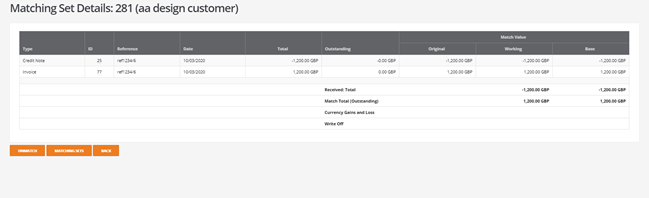
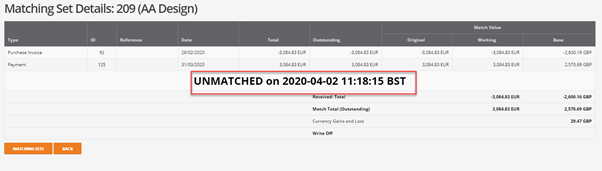
Unmatch a matching set
The option exists to also unmatch a matching set if required.
In either the customer or supplier show screen under the documents and transactions tab in the new financial matching sets option.
Select the matching set by clicking the financial matching set ID and click the unmatch button( as above screen shot).
A warning will be given:
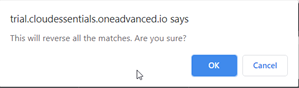
Click ‘OK’ and the set will be unmatched and the documents will be ready to be included in another match set:
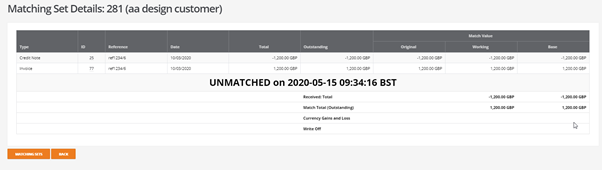
The matching set will then show as obsolete in the financial matching sets:

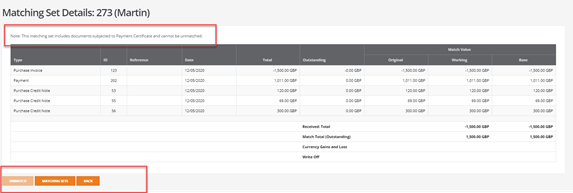
Write Off
The ability to match documents and write off small amounts is part of the part matching feature.
Select the customer receipt /supplier payment and documents that are required to be matched together:

If there is a difference in the match set there will be a warning on the screen and the orange confirm match button will be inactive.
Providing that the user has the write off limit set to allow the write off to take place the value of the write off can be placed in the write off field and the matching will then balance:
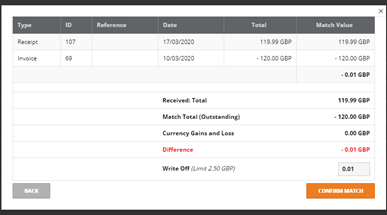
The matching set will then show the balancing write off value and a journal will be created automatically in the system for the write off value:

Note: If a matching set with a write off within it is unmatched the write off will be reversed out.
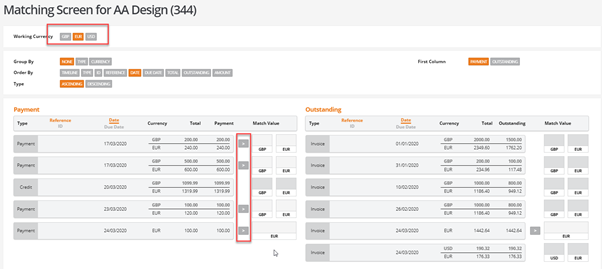
Matching in currency
If there are documents on a customer or supplier account in currency other than base currency then the working currency option will be available to allow selection of the currency to match in:
Example
Select Euro as the working currency – all documents entered in Euros will be available to be selected including payments and receipts.
Other documents i.e. ones entered in a currency other than Euros will be shown but not able to be selected at this point.
When a matching set is created – if there are differences between the currency rates for the document date and the payment date then a currency gains/loss posting will be created automatically at the match point:
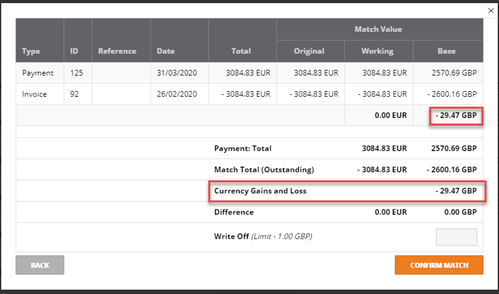
This will be posted to the exchange gains and losses account.

Note: If a matching set with a currency gains/loss within it is unmatched the currency gains/loss will be reversed out:
Reports and enquiries
A number of reports and enquiry screens have been changed to allow for part allocations to be viewed.
Reports
Aged debtor report
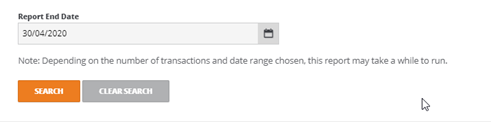
The report end date selection will now report what the account looked like on that date so if the report is run for the 30.04.2020 it will show documents that were physically on the account and outstanding on that date:
Example
If on the 2.05.2020 a document is posted dated the 30.04.2020 that document will not show until the report is run as at 02.05.2020.
This is to allow for retrospective reporting.
Payment terms for the customer now show and the unallocated column shows any unallocated cash on the account:
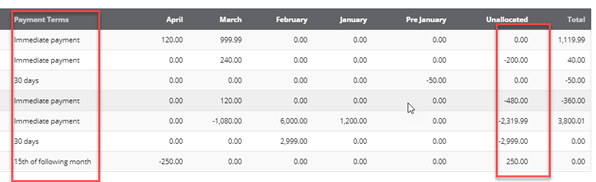
Part matchings will also show where applicable.
Example aged debt report:

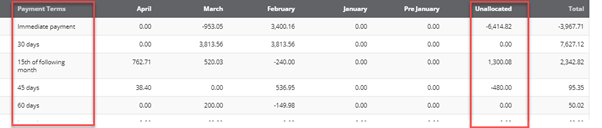
Part match a document on the account:

Re run aged debt report:

Detailed aged debt
This report uses the due date to age the debt into the correct column. The due date is calculated from the payment term on the document not the default term on the customer account.
The report now shows part allocation values. Unallocated receipts will be treated as immediately due and aged accordingly.
Example: Receipt entered with a date of 08/06/2020, added onto the account as unallocated. Detailed aged debt report run for 08/06/2020, unallocated receipt will appear in the current column. Detailed aged debt report run for 09/06/2020, unallocated receipt will appear in the older column
Aged creditor report
As per aged debtor: Payment terms for the supplier now show and the unallocated column shows any unallocated cash on the account, part matchings will also show:
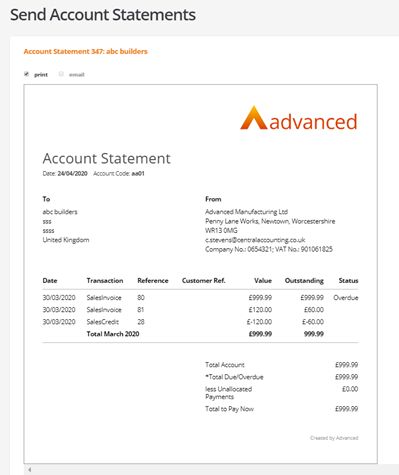
Customer account statement
An outstanding value column is now available:

Print and send
An outstanding value column is now available
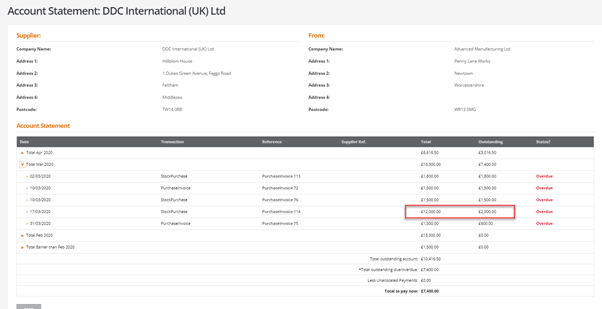
Supplier account statement
An outstanding value column is now available:
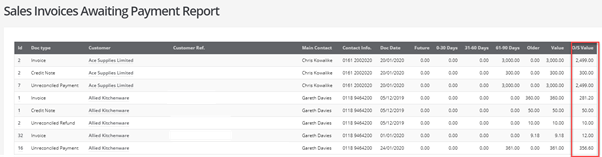
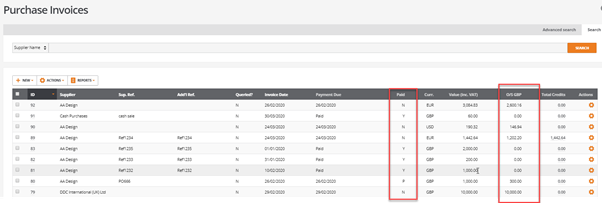
Sales invoices awaiting payment
An outstanding value column is now available:
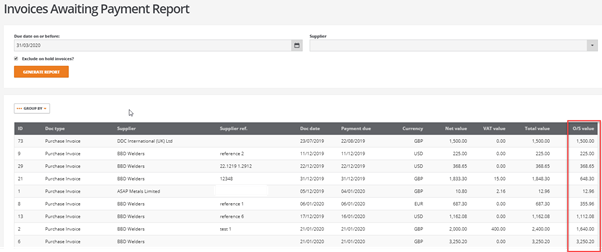
Purchase invoices awaiting payment
An outstanding value column is now available:
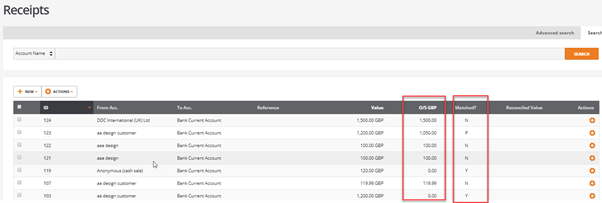
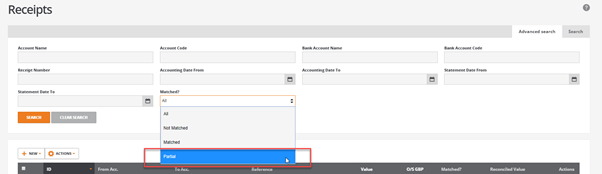
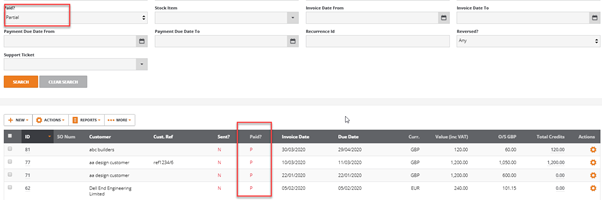
Receipts report
There is an outstanding value column and also a matched column that shows the status of the receipt as Y (yes) N (no) and P (part):
Payments report
There is an outstanding value column and also a matched column that shows the status of the receipt as Y (yes) N (no) and P (part):
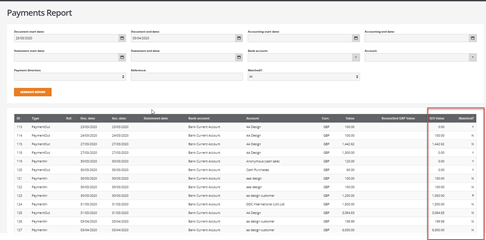
The advanced search on both the payments and receipt reports matched drop down has the option to select items that have been partially matched:
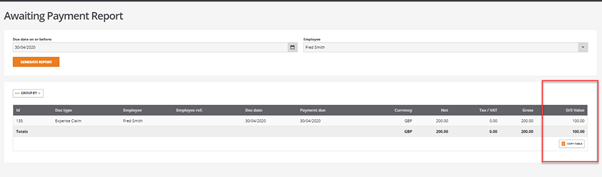
Payslips awaiting payment report
This report now has an outstanding value column:
Enquiries
Customer and supplier show screens:
General tab
On the general tab there is an outstanding value column and also a ‘Matches’ column to show how many document matches have been made against the document:
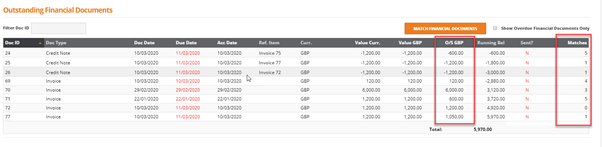
Click on the ‘Matches’ option and the system will show all of the matching sets that the document can have been part of. This will also show sets that have been unmatched as well:
Click the back button to go back to the customer show screen.
By clicking on the matching set ID on the required record the user can drill back to the match set:
Documents and transactions tab
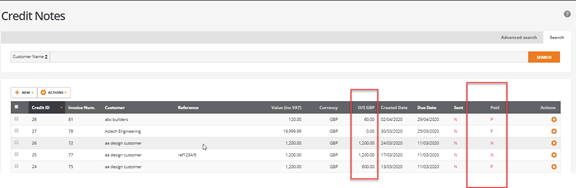
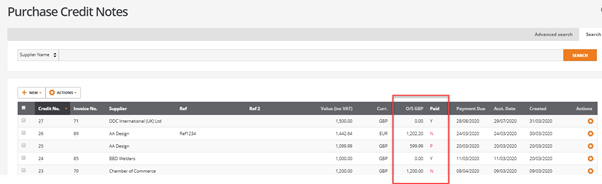
On the documents and transactions tab there is a paid column that shows the status of the receipt as Y (yes) N (no) and P (part) and also an outstanding value column for invoices and credit notes:
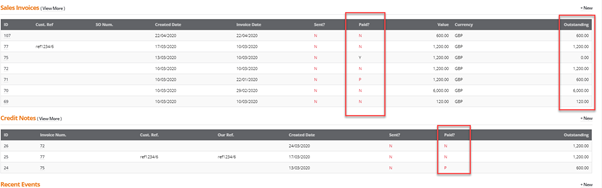
Sales and purchase invoices and credits listing screens
In the list view screens for these documents there is a paid column that shows the status of the document as Y (yes) N (no) and P (part) and also an outstanding value column:
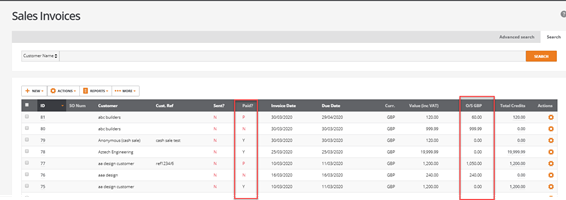
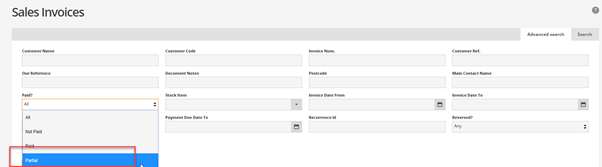
Advanced search
The advanced search on list screens ‘paid?’ drop down has the option to select items that have been partially matched:
Customer receipts
Customer receipts have been updated to reflect the changes made to part matching:
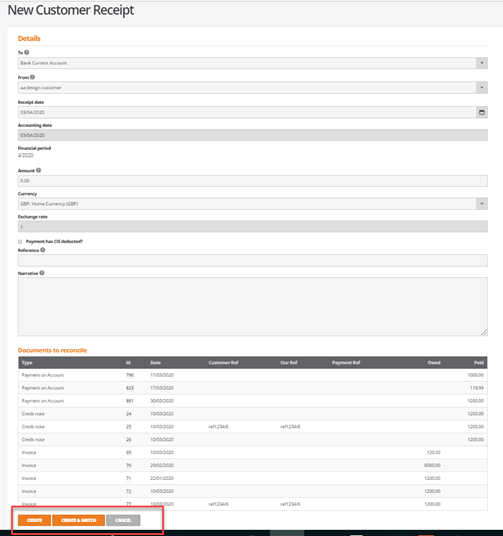
There is now the option in receipts to create a receipt on account using the create button, or create and match the receipt and the invoices at the same time using the create and match button.
Clicking create will just add a receipt on the account that can be matched at a later point via match financial documents.
Create and match will take the user into the match screen with the receipt preselected:
Supplier payments
Supplier single payments have been updated to reflect the changes made to part matching.
Payment on account
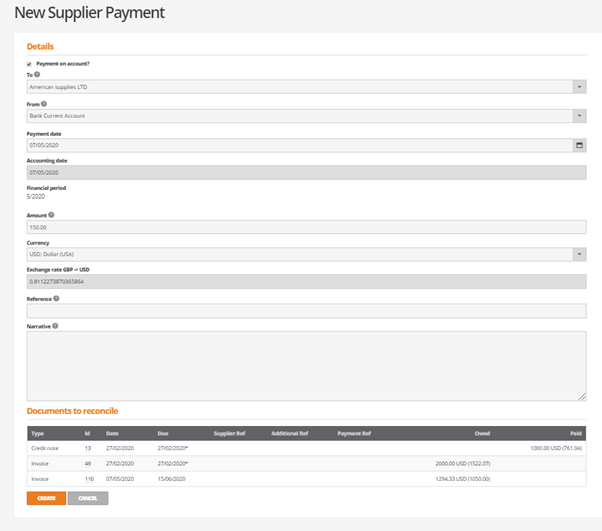
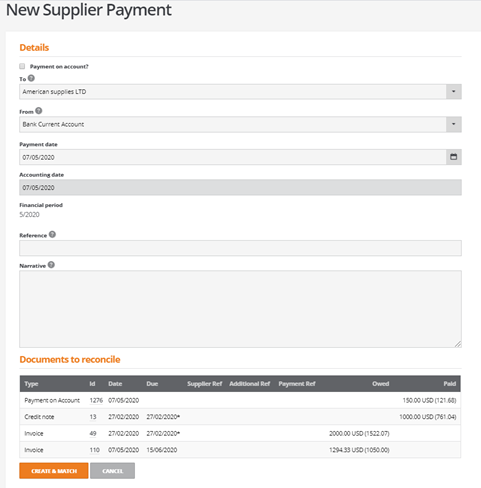
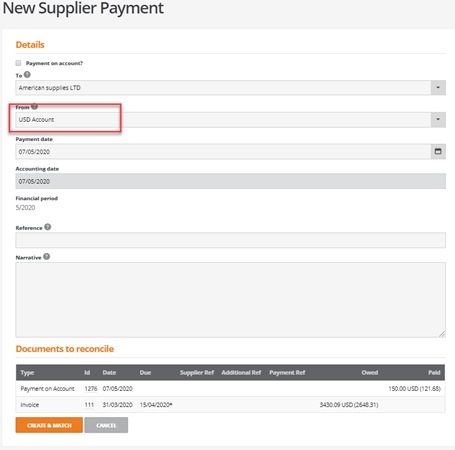
The single supplier payment screen now has a payment on account option:
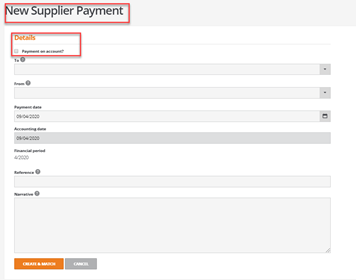
Tick the box labelled Payment on account?
This opens up amount and currency fields and will show the exchange rate .This also changes the create and match button to create only.
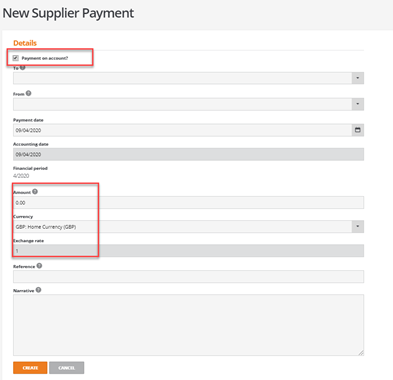
Enter the details: supplier, bank account and amount and the suppliers document list will appear
Note: the documents cannot be selected here as this is creating a payment on account:
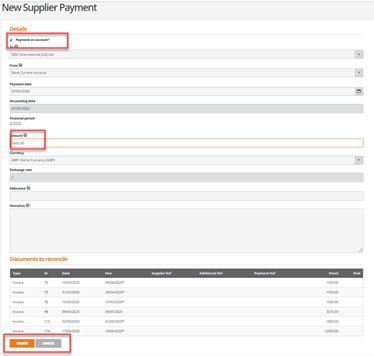
Click on the create button
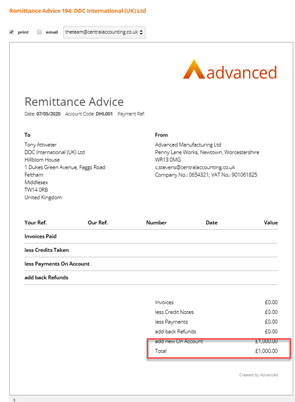
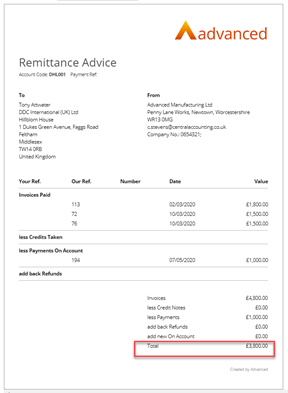
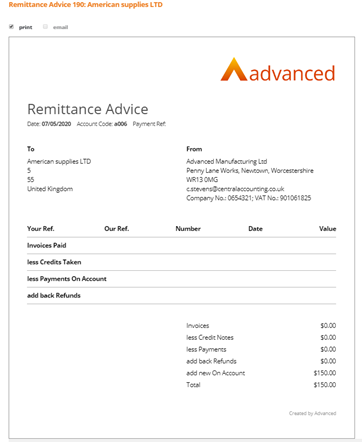
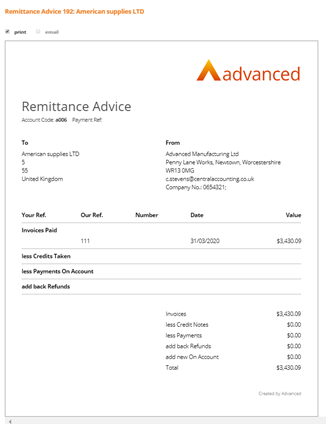
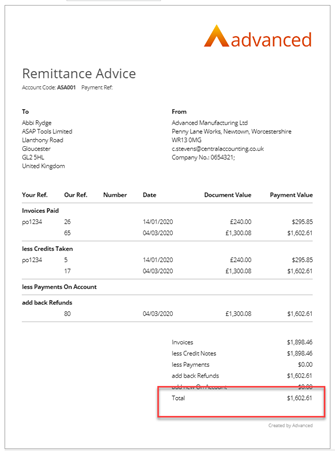
This will create a payment on account and create a remittance advice:
This creates a payment on the account that can be matched at a later stage:
Create and match
If payment on account is unticked then the amount, currency fields and the exchange rate will not be shown at this point. The suppliers document list will appear but will not be selectable at this point:

Click on create and match.
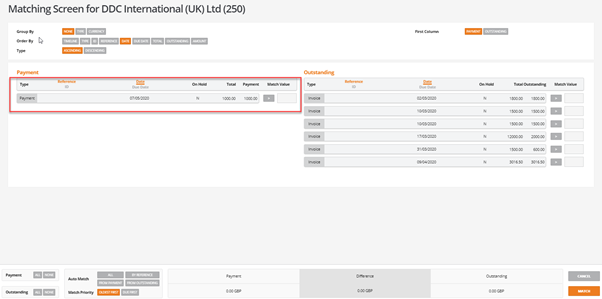
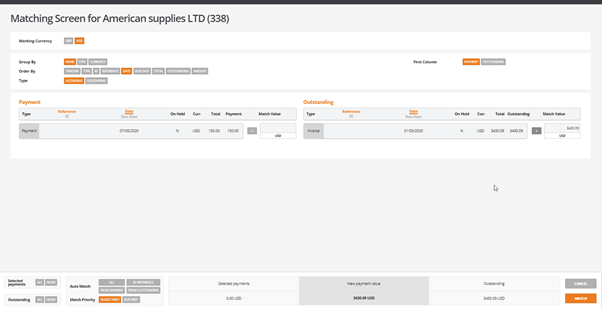
This will open the matching screen.
Select the documents that are required in the payment and click on match:
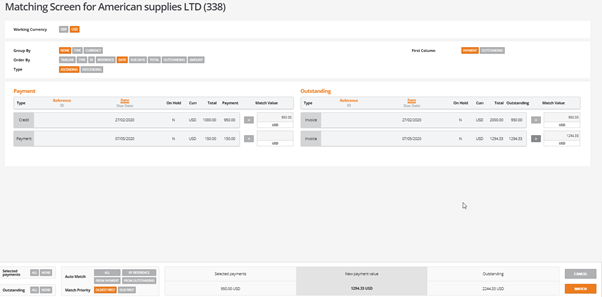
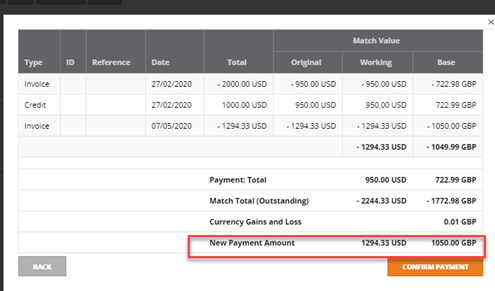
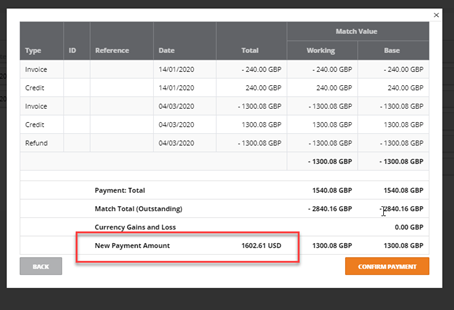
The match screen will show the confirmation of the payment amount:

Payment total = the credit(s) selected.
Matching total= the invoice(s) selected.
New Payment amount = the invoices minus the credit value.
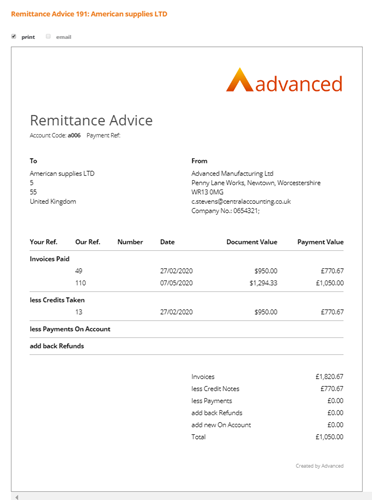
Click confirm payment to make the payment to the supplier.
This will create the remittance advice:
The financial matching set will have been created in the supplier show screen, documents and transactions tab.

Currency matching
Payment on account in currency
An example below to show a payment on account using currency:
USD from a GBP bank account.
Tick the box labelled Payment on account?
This opens up amount and currency fields and will show the exchange rate .This also changes the create and match button to create only.
Enter the details: supplier, bank account and amount and the suppliers document list will appear.
Note: the documents cannot be selected here as this is creating a payment on account.
Click on the create button.
This will create a payment on account and create a remittance advice.
This creates a payment on the account that can be matched at a later stage:
Create and match from a GBP bank account with currency invoices
Click create and match:
Select the documents to be paid.
Payment will be made in the currency of the bank account:
A remittance advice will be created.
Create and match from a currency bank account with currency invoices
If using a US dollar account.
Click create and match.
Select the required documents:
Click on match:

Confirm payment.
Documents will be paid in dollars.
Create and match from a currency account where the documents are only in GBP

Click create and match:
Click on match:
Payment will be made in USD.
Click on confirm payment.
A remittance will be created:
Cash accounting
New Company setting
In Company Settings - Tax and Payroll, a new setting ‘Cash Accounting’ is available.
Note: This has replaced the tick box on the VAT Return Report:
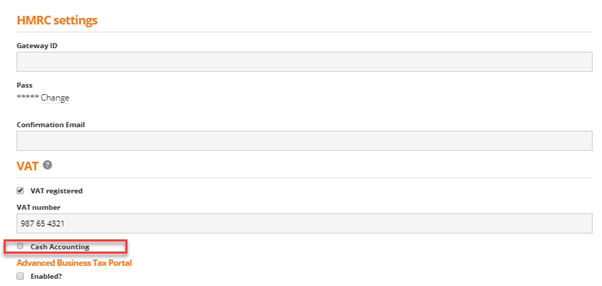
Part matching and unmatching in the match financial documents will be disabled if this box is ticked in company settings:
With cash accounting, only payments, receipts and refunds can be part matched, credits and invoices must be matched in full. Payments, receipts and refunds will have a chevron against them and the field will be enabled. Invoices and credits will only have a tick box and will have the field disabled.
VAT
Documents will show on the VAT report once they have been matched/paid, if cash accounting is enabled.
The system will use the matching date to determine which VAT return the documents should appear on.
CIS changes
CIS payments for suppliers
When a payment certificate payment is created for a CIS supplier the system will now create a matching set in line with the changes for part matching.
Note: On the payment certificate payment screen there is only the option to match the certificate.

This matching set will not be able to be unmatched:
CIS receipts for customers
As above the customer receipt for a CIS receipt will also create a matching set.
The option to create or create and match will appear on the receipt screen as per customer receipts.

Again this matching set will not be able to be unmatched:
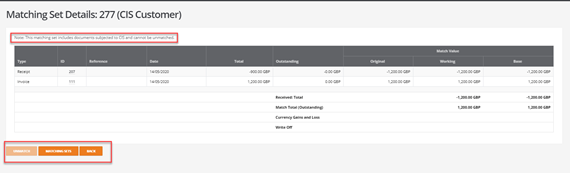
Note: The total value of the receipt and the received value on the matching screen are different indicating it is partly made up of a CIS value:

The financial documents for a receipt created with CIS should:
Credit the customer account by the receipt amount plus CIS value.
Debit the bank account by the receipt amount.
Debit the CISCUST account by the receipt CIS value.
Employee payments
Changes have been made to employee payments to allow for the part matching functionality.
When an employee payment is created there is now the option for a payment on account or to allocate payslips and expenses claim via the create and match option ( as per supplier payments).
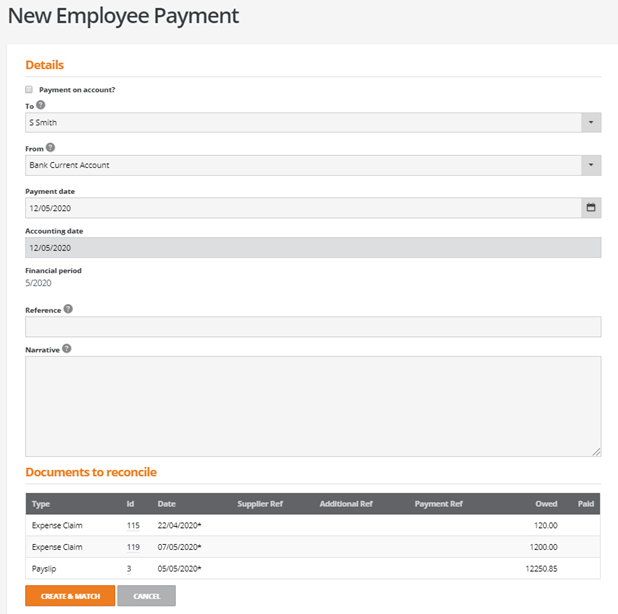
Select the required employee and the bank account.
Click on create and match:
Note: A pay slip cannot be part allocated in the matching screen.
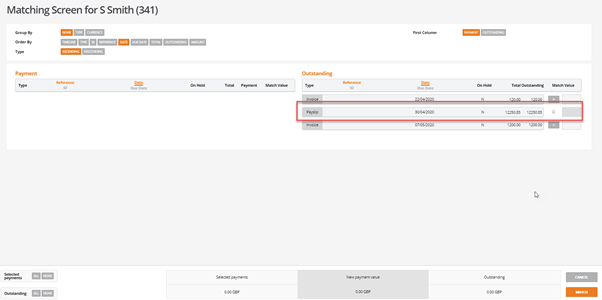
Part match screen:
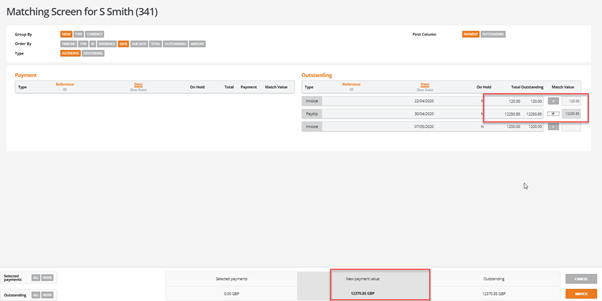
Select the items to be paid.
New payment value is the value to be paid to the employee.
Click on match:

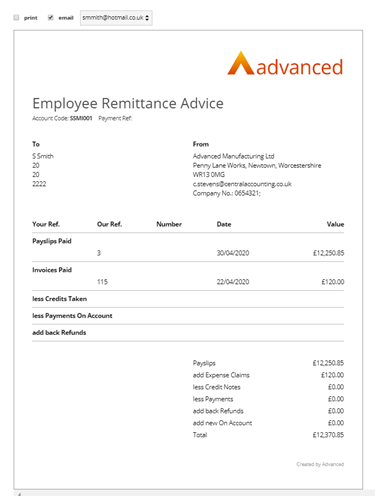
Confirm the payment.
A remittance will be created:
Changes to credit and refund screen
For both customers and suppliers the screen for creating a credit and refund has changed slightly.
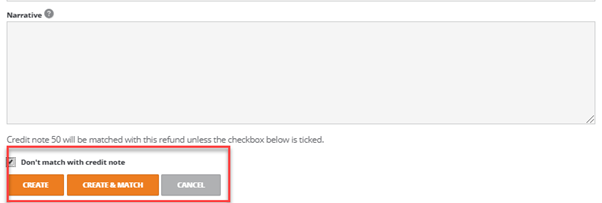
When creating a credit note if create refund option is ticked, on saving the credit the refund screen will open:
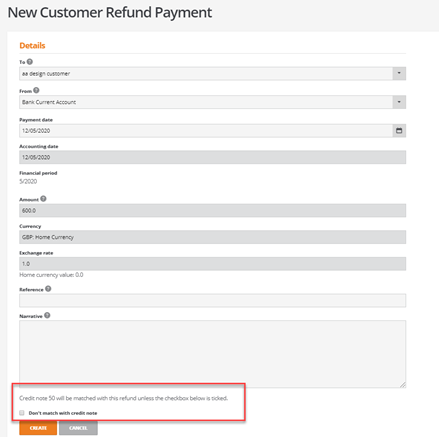
If the checkbox is not ticked the credit and the refund will be automatically matched and the create button will be the active button.
If the check box on this screen is ticked, the refund and the credit note will not be matched automatically and the create and match option will become active .This will take the user to the part matching screen to allow the credit and the refund to be selected: